


Written by Ambre Montespan - Updated on Jun 12, 2026
Table of contents:
Looking for a fun, hands-on, and creative craft? Want to make a real ocarina, a wind instrument with Italian roots? How do you build this musical instrument from scratch?
I’ve loved the sound of this little instrument for a long time and have already made an ocarina more than 10 times. I’ve successfully made them out of clay, wood, and metal, so I can help you design your own by guiding you step by step.
To make an ocarina, you first shape the chosen material into a hollow chamber, then craft the whistle, and finally drill several holes to tune the instrument to the desired pitch.
By reading this article, you will learn:
- The materials you’ll need to craft your future instrument
- How to shape the body of the ocarina
- How to tune it accurately
This will enable you to handcraft your own ocarina using the materials you have available, purely for the joy of it.
Let’s start by looking at how to make this instrument, which works a bit like a flute.
What materials do you need to make an ocarina by hand?
The materials described below are ideal for crafting the simplest ocarinas—those made of clay. If you prefer to work with metal, plastic, or wood, you’ll simply need to adjust your tools to achieve the same results outlined in the next paragraph. So, you will need:
- self-hardening clay, which you can find in stores. If you use clay that you make yourself, cracks may appear during drying.
- Water
- A knife
- Wooden sticks, such as popsicle sticks
- Drill bits of different diameters
- Wire cutters
- Medium-grit sandpaper or a grinder
How to build the body of the musical instrument?
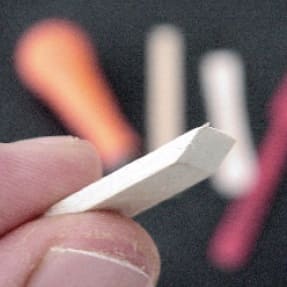
The first step is to trim two of your wooden sticks to give them a beveled edge, as shown in the photo below. Start by cutting the rounded side to make it straight. Then, you can use a grinder or sandpaper to achieve this result. If you already have two tools or objects that are roughly this shape, you can skip reshaping the sticks and use those objects instead.
Once your sticks are ready, open the bag of clay and remove a chunk roughly the size of your closed hand. You can, of course, take more or less to vary the final dimensions of the ocarina. Knead the clay, then throw it repeatedly and vigorously onto a table to remove any small air bubbles it may still contain. Finally, shape it into a smooth ball and cut it in half with the knife.
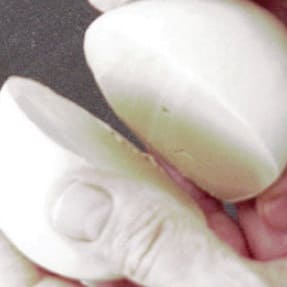
Shape the clay with your hands as if you were creating two bowls, using your thumb to create a hollow inside each hemisphere. It’s important that the sides of your two bowls are as even as possible. If at any point you notice that the clay is drying out or cracking, add a little water to moisten the material. Make sure that both bowls have the same diameter when finished.
The next step is to merge the two bowl-shaped pieces of clay that will form the sound box of the ocarina. To do this, use the knife to create small grooves on the flat edges of the bowls that will come into contact with each other when they are glued together, which will improve the bond. Add a little water and assemble the two pieces. Apply a gentle twisting motion as the two flat edges meet to help the future instrument come together, but don’t press too hard or you may deform the sphere.
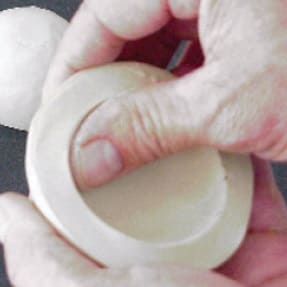
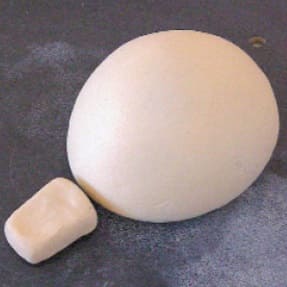
Next, use your fingers, water, and a small piece of clay to join the two parts together. The goal is to obtain a smooth, hollow ball without any imperfections. You can use a stick or a spreading knife to help you. Finally, flatten the ball slightly on a table to obtain the result shown in the photo below:
You’ve just created the base of the ocarina’s resonating chamber. Now it’s time to shape the mouthpiece, the part you’ll blow into. Take a little more clay from your stock, about the size of a golf ball, and shape it into a rectangle to obtain proportions similar to those in the image below:
Now attach these two pieces of clay together using the same method as before: add grooves with the knife while applying water. Press them together neatly. You should end up with something like this:

Next, take one of the two sticks, moisten it with water, and carefully insert it into the mouthpiece from the beveled side until it reaches the hollow chamber of the ocarina. Do this slowly and carefully, keeping the stick parallel to the rectangle of the mouthpiece, and be careful not to go too far—you don’t want to pierce the wind instrument all the way through. Once you’ve done this, leave the stick in place.
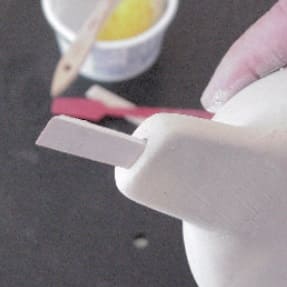
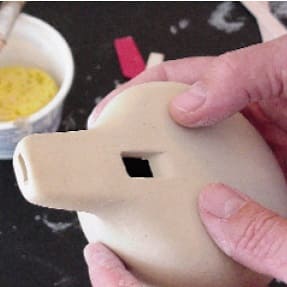
Next, shape the whistle—the part that produces sound when you blow. Carefully cut a square of clay with sides matching the width of your sticks. Position this square on the flat part of the hollow sphere, aligned with the first stick that remains inside the mouthpiece, just after its end. Use the second stick as a guide to remove as perfect a square as possible. You can, of course, moisten it to make the task easier, and you should be able to see the stick inside the instrument at the end of the operation.
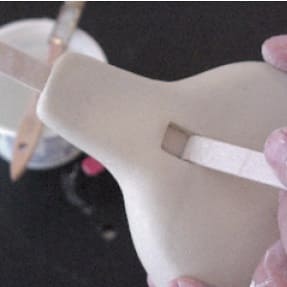
Next, create a 45° angle starting from the side of the square opposite the mouthpiece and joining the flat surface of the instrument. Use the beveled edge of the stick to do this. This angle is very important, as it will create the whistling effect needed to produce sound. Once the angle is complete, carefully remove the stick from the mouthpiece and try blowing into it. If you hear a sound, you’re all set. If not, simply reinsert the stick, sharpen the angle, and try again. Don’t worry—any clay that touches your mouth is non-toxic.
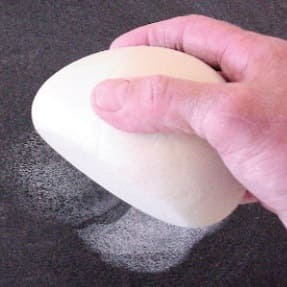
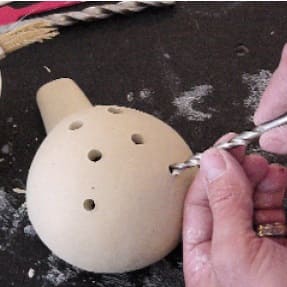
At this stage, the instrument you have created is more of a whistle than an ocarina. You will need to add a number of holes depending on its size. You can make these holes using drill bits in a random pattern. However, if you really want to tune your instrument to play specific musical notes, you should read the section dedicated to this topic.
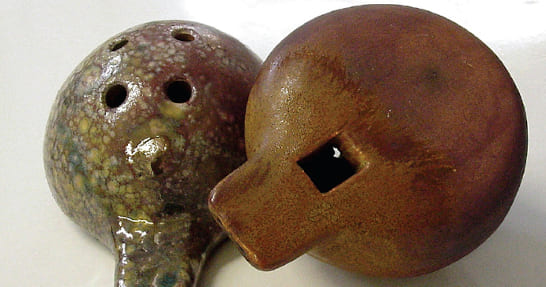
Now just leave your ocarina to air-dry for 24–96 hours in a low-humidity spot, away from direct sunlight. Once it’s fully dry, you’ll have an ocarina you can paint or varnish to suit your style.
How do you tune this wind instrument?
If you want to play specific notes on your ocarina, you will need to tune it using an electronic tuner. This article describes the correct method for tuning your ocarina. Simply follow these instructions to ensure that your ocarina plays the right notes.
How do you bake a clay ocarina without an oven?
There are several types of clay that require higher or lower temperatures to harden, a process called vitrification. For most clays, this temperature is around 2,280°F (1,250°C), which is impossible to achieve with conventional kitchen ovens. Some musicians have tried firing an ocarina on a grill, but the results weren’t very good. That’s why I recommend using self-hardening clay that doesn’t require firing to make your ocarina.
How can you make an ocarina out of wood, metal, or plastic?
As I mentioned earlier, the method for making your own ocarina is the same, even if you are not using clay. Therefore, you just need to follow the tutorial above with the material of your choice. However, shaping this material will inevitably be more complex than with clay. You may need to use wood glue or welding equipment to create a functional ocarina.
Treat yourself to an ocarina created with great precision
Fun and fairly simple to make, an ocarina can ultimately be created with very few resources. It is therefore an activity that is accessible to most people, even children, who will be delighted to leave with this beautiful musical instrument in their pocket.
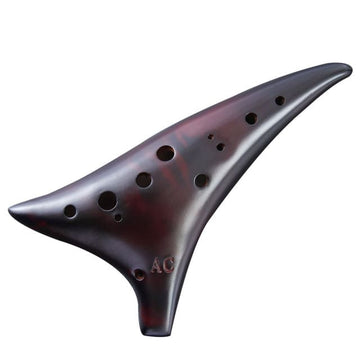
However, if you want to play well-known songs with this type of flute, you will need a model with greater precision to play the right notes. As this precision is quite complex to achieve, a model produced from a mold will be more suitable. The Instruments du Monde store offers a high-quality 12-hole ocarina that will delight your ears with its pure sound.
Appreciate the ocarina for what it is and treat yourself to this instrument by clicking on the image below:
To understand exactly what an ocarina is—and what it isn’t—we recommend reading our other article titled: What Is an Ocarina?. That way, you’ll always be sure you’re recognizing this musical instrument.


