


Written by Ambre Montespan - Updated on Jun 12, 2026
Table of contents:
Do you have a kalimba that you’ve taken apart to clean it thoroughly? Have you ordered a thumb piano kit to assemble? Do you want to build your own musical instrument? Not sure how to install the tines on a kalimba?
I’ve been taking apart and reassembling my many kalimbas for over 10 years, so I know the exact method for mounting all the keys on this percussion instrument. In other words, I can walk you through it step by step so you can do it yourself, easily and confidently.
To install the tines on a kalimba, work one at a time, applying enough pressure to bend each tine between the two bridges. For this step, you’ll need a tuning hammer, another metal tine, or a pair of pliers.
By reading this article, you will learn how to:
- Install the bridges and pressure bar to hold the instrument’s keys in place
- Mount the tines on the kalimba
As a result, installing the tines on your thumb piano will be a simple formality, and you’ll soon be able to play your instrument and create beautiful melodies.
Now, let’s get right into how to do it.
Installing the bridges and pressure bar on the instrument
You might be in a situation where you’re building a new musical instrument that has never been played. In that case, neither the bridges nor the pressure bar may be attached to the kalimba’s soundboard. If so, you’ll need to install these parts first before moving on to installing the tines. If you only have the metal keys to install, you can skip ahead to the next chapter.
To start off on the right foot, it’s helpful to review the main parts of a kalimba. You can see them in the photo below:
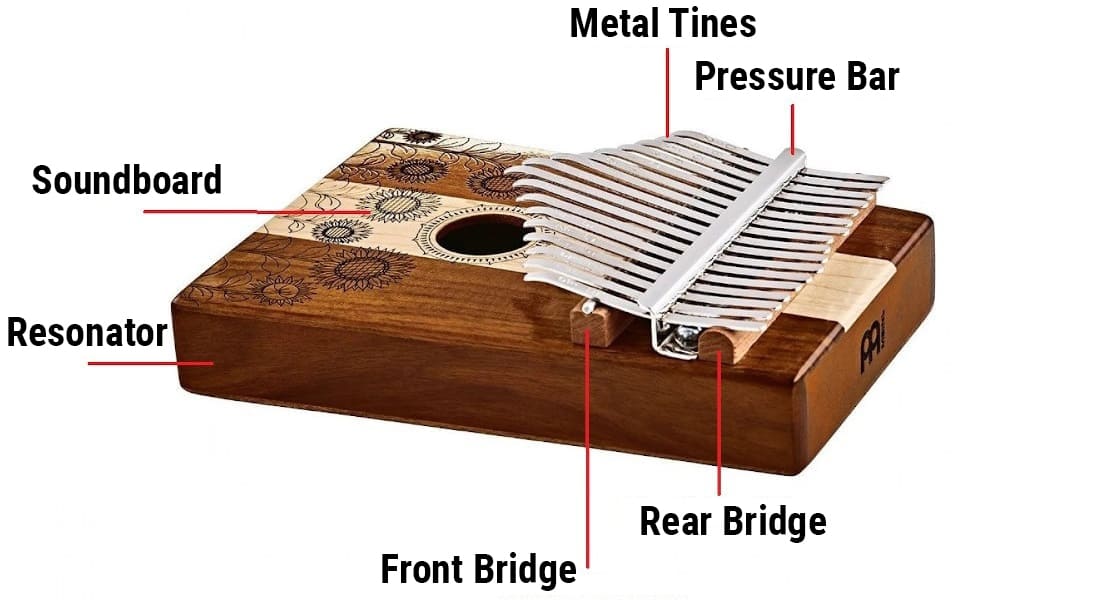
Here, we’ll focus on the two bridges and the pressure bar located between them. The two bridges must be glued directly onto the soundboard. Be careful not to confuse the rear bridge, which is made entirely of wood, with the front bridge, which has a small horizontal metal bar. The front bridge is also slightly larger than the rear one. The distance between the top edge of the kalimba and the top edge of the rear bridge is about 1.5 cm (0.6 in). The empty space between the two bridges is about 2.5 cm (1 in), leaving enough room for the pressure bar to sit between them.
The pressure bar is screwed directly into the kalimba’s soundboard. You’ll notice that the part of the pressure bar resting on the wood also makes contact with the rear bridge, so position it exactly as shown in the photo above. Once this first step is complete, you’re ready to mount the tines on your kalimba.
How to bend the tines to install them on the kalimba
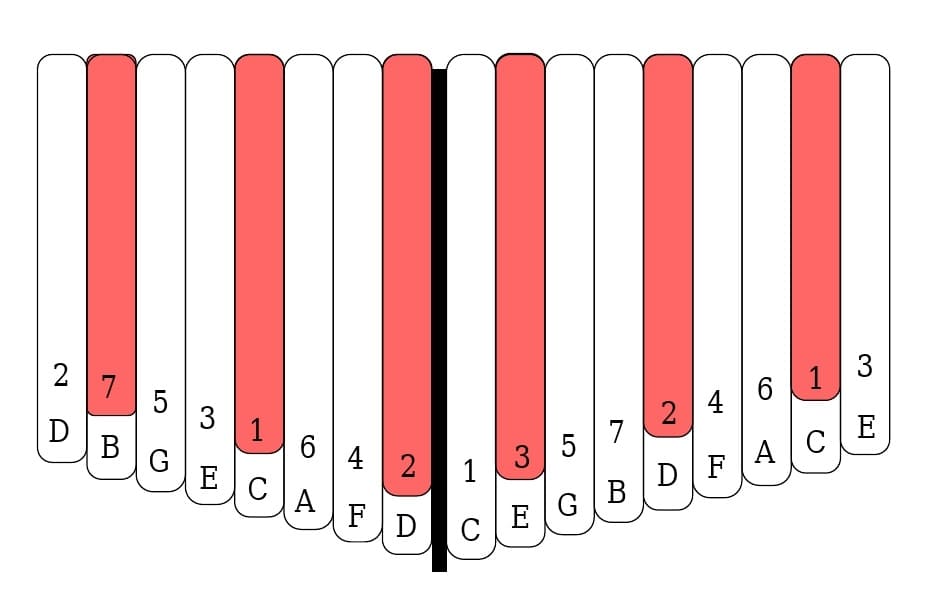
To install all the metal keys on a kalimba, you’ll need to work one tine at a time. Choose any tine, but make sure you position it in the correct place, meaning aligned with the matching hole in the pressure bar. If you’re not sure where it goes, remember that the longest tine sits in the middle, and they get shorter as you move toward the sides of the instrument. If your tines are engraved, you can also refer to the diagram below for a 17-tine model:
Once you know the correct position, place the tine on the front bridge and feed it through the hole in the pressure bar. As you push it forward, you’ll see it stops against the rear bridge, and you won’t be able to seat it properly without applying pressure. Grab another tine (any one): you’ll use it as a temporary “support” to help you install the first tine.
To do this, position the second tine so it rests on the front bridge, goes into the same hole in the pressure bar as the first tine, but passes underneath the first tine. Once it’s set up this way, simply tap the first tine with a tuning hammer so it bends and locks into place on both bridges. Once the tine is correctly seated, remove the supporting tine with pliers. Watch the video below for a more detailed demonstration of this method.
Repeat the process until you reach the last tine. Of course, you won’t have an extra tine to use as support for that final one. In that case, use pliers to bend the end that’s pressed against the rear bridge while tapping the other end of the tine with the tuning hammer. Your kalimba (or sanza) is now reassembled, but it still won’t produce the right notes—don’t forget to tune it so you can play in tune.
Note that there’s also a technique for installing several tines at once. It involves slightly loosening the pressure bar, which lets you slide in all the tines by hand—except those positioned directly in front of the screws. Once all the keys are in, simply tighten the pressure bar again to bend and secure the tines. However, you’ll still need the previous method for the remaining tines, and of course, you’ll need a Phillips screwdriver to loosen and tighten the pressure bar.
Gather the right tools and assemble your thumb piano under the best conditions
Installing the tines on a kalimba is a fairly simple and quick operation, as long as you know the method. It requires only a few tools and can be done even by beginners who are discovering this instrument for the first time. Now that you’ve seen the process step by step, you’ll have no trouble attaching all the metal keys to your mbira.
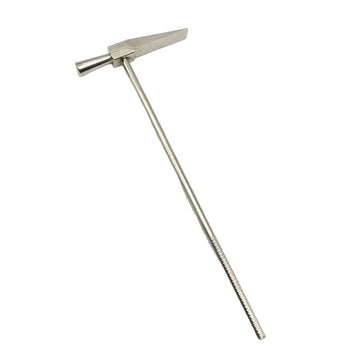
However, a tuning hammer is essential for successfully mounting the tines on the instrument. This accessory is perfectly suited to the dimensions of the tines, and using another tool could scratch, bend, or damage your thumb piano. That’s why Instruments du Monde recommends this tuning hammer, which lets you install your kalimba keys with complete peace of mind.
Get this hammer now by clicking on the image below:
Older adults can really benefit from learning to play the thumb piano. However, choosing the right model matters if you want to make learning easier. Find out how to pick the best option by reading this article that explains which kalimba to choose for a senior. You’ll see that the perfect instrument depends on many factors. Or, read our complete guide to the kalimba to learn plenty of fascinating details about this musical instrument.


