


Written by Ambre Montespan - Updated on Jun 11, 2026
Table of contents:
You’re all set! You’ve just bought a kalimba, and it came with stickers, but you don’t know how to put them on? What are these stickers for? Have you noticed that some kalimba players have a specific way of placing their stickers, and you’re wondering why?
After more than 10 years of regular kalimba practice, I’ve had the opportunity to place stickers on dozens of thumb pianos. So I can answer all your questions and explain why these stickers matter, as well as how to apply them the right way.
Kalimba stickers go on the instrument’s steel tines. If they’re a single color, they usually sit in the middle of certain tines as visual markers. If a sticker shows a letter or a number, it represents a musical note and needs to be placed on the matching tine.
In this article, you will finally understand:
- Why stickers are essential for the kalimba
- The best methods for applying them
- How to remove them without damaging your precious instrument
Placing stickers on your kalimba will become a breeze. That way, you can start learning—or level up your playing—in the best possible conditions.
Let’s dive in below.
What are kalimba stickers used for?
Before exploring the different types of stickers available for the kalimba and how to install them, it’s important to understand the basics. Let’s go over everything you need to know about these repositionable stickers for your African instrument by answering the most common questions on the topic.
What are kalimba stickers?
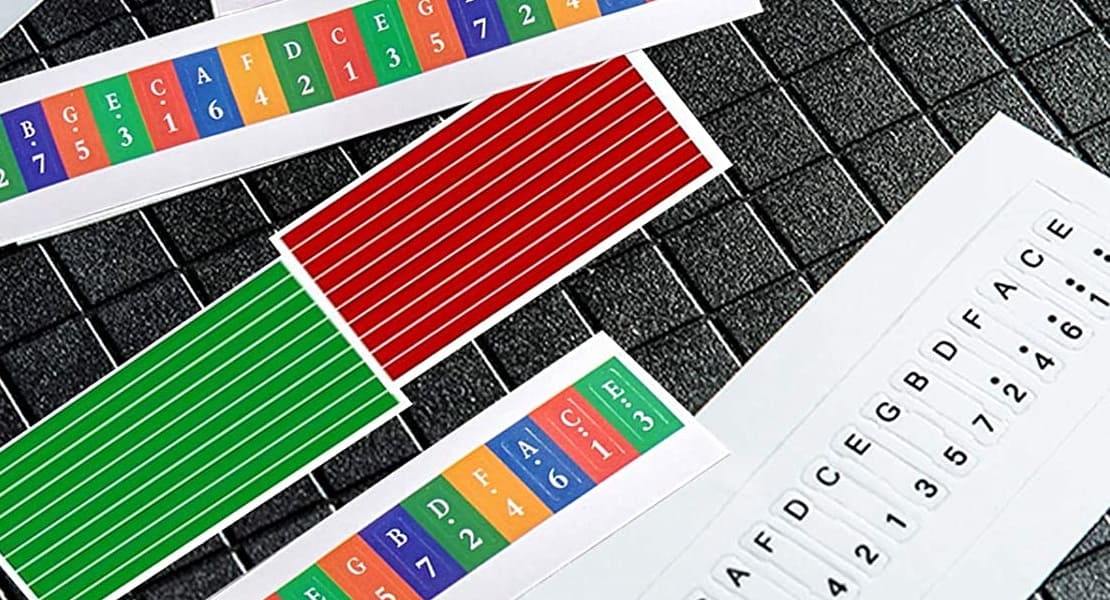
They’re simply a set of thin adhesive labels grouped on a sheet and pre-cut for easy placement on your instrument. They’re a lot like the little stickers kids use for crafts. They come in different colors and shapes, and some may feature a number, a letter, or even a symbol.
Why add stickers to your kalimba?
Now let’s get a bit more hands-on so you can see all the benefits of placing stickers on your kalimba.
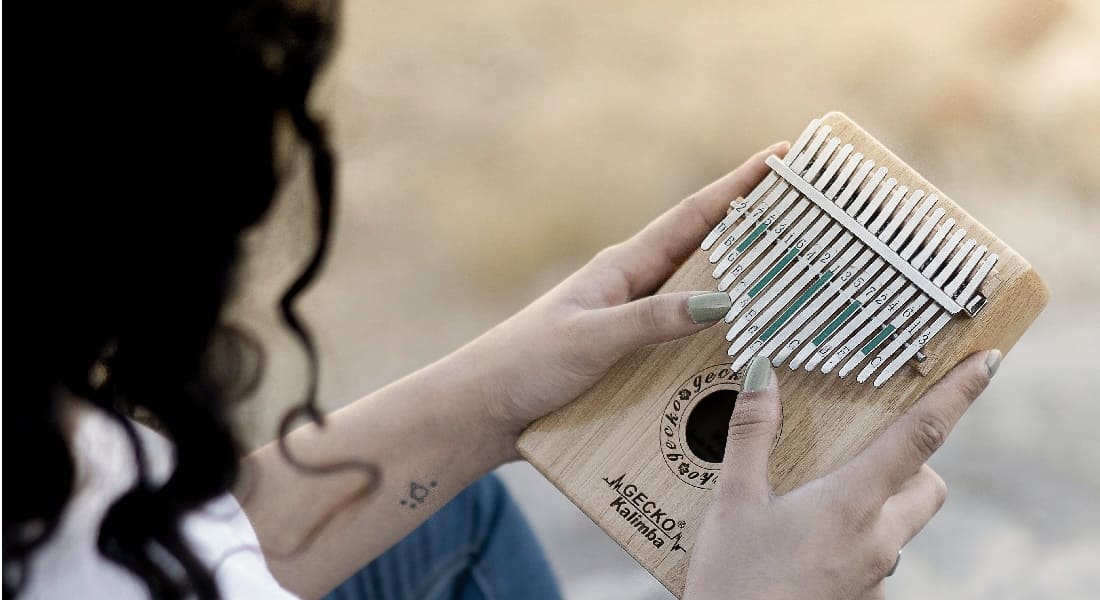
1 – Make it easier to find the notes
The standard kalimba model has 17 steel tines. Each of these keys corresponds to a musical note, much like a piano. However, unlike a piano, the keys are not black and white at regular intervals, but are all the same silver-gray color of the steel they are made of. As a result, players often mix up the tine they meant to play.
Placing stickers sparingly on your kalimba will help you quickly spot reference points and avoid tine mix-ups. This is especially true since some models have far more than 17 tines. The value of adding these visual markers becomes obvious fast. In the video below, you’ll see the musician using stickers to stay oriented and avoid hitting the wrong note.
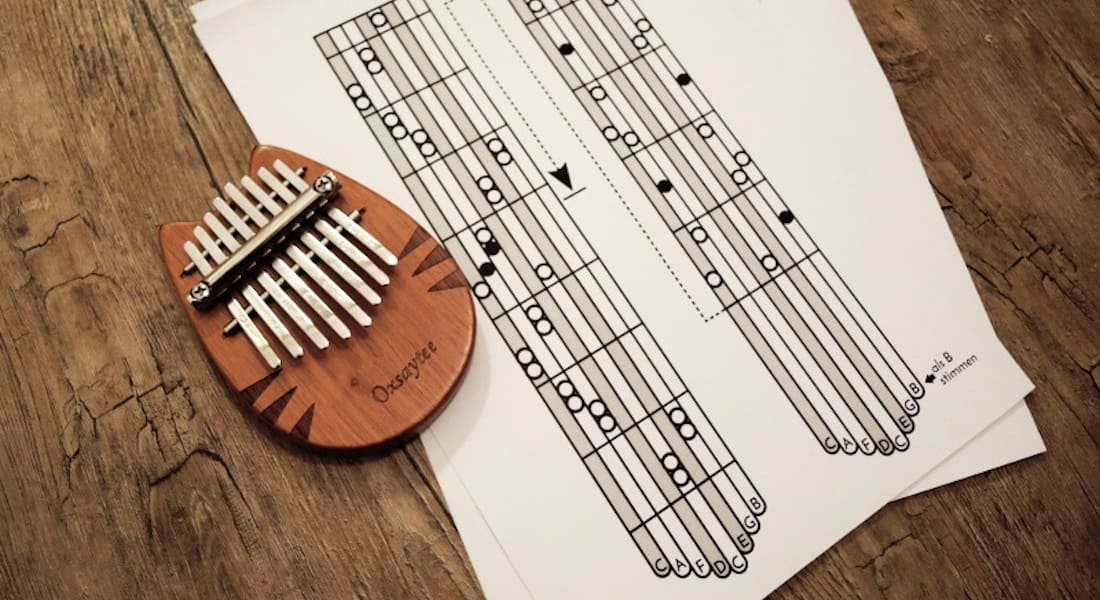
2 – Read tablature and sheet music more effectively
If you want to reproduce certain famous melodies, you will probably turn to sheet music or tablature. In many tabs, you’ll notice that certain columns—representing specific tines—are highlighted or darker than the others. These are markers designed to help you locate yourself on the kalimba more easily. By matching the markers on your instrument with those on the tablature, you’ll read it faster, make fewer mistakes, and improve your technique.
Over on the Instruments du Monde website, you can grab dozens of completely free tablatures and sheet music in PDF format for the kalimba. These are high-quality, popular melodies that have already been tested and approved by hundreds of musicians. Once you’ve placed your stickers correctly, you’ll be able to play all these pieces more easily.
3 – Know the note being played
Unlike a piano, where the notes are arranged in the traditional order (C, D, E, F, G, A, B, and so on), the kalimba has a note layout that can feel a bit “random” at first. So if you want to play a specific sequence, you’ll need solid memory to keep track of where each note sits.
Fortunately, the stickers you can place on each tine let you gradually learn the exact location of every note until it becomes automatic. Note that some kalimbas have engraved tines. These engravings show the musical notes, so you may not need certain sticker types—although it’s still helpful to use the ones meant for visual markers.
4 – For the design and personalization of the instrument
The final advantage of stickers is, of course, that they let you decorate your instrument to match your taste and personality. The nicer it looks, the more you’ll want to pick it up and play. That makes learning more enjoyable—and often faster. Plus, a personalized instrument can feel more relaxing, helping you fully unwind during your playing sessions.
Adhesive labels? For beginners, but not only!
After reviewing all the benefits, you might assume this is only for beginners. In reality, that’s not the case!
While it’s true that beginners are the first to benefit from stickers, experienced musicians will also find them useful. Most kalimbas on the market today are tuned to C major. However, an experienced player will inevitably want to explore other options by buying a model with a different tuning or by retuning their own instrument. In that situation, the “map” of the notes can change a lot. A tine you used to associate with a specific note may no longer play that same note after a tuning change—which is exactly why stickers can be helpful even for seasoned players.
Why should I never use paint on my percussion instrument?
You might think that instead of using stickers, you could use paint or another method to mark the tines, such as a felt-tip marker or even a punch. I strongly advise against this.
With paint, it’s easy to accidentally stain your instrument. And if you ever want to remove or change the markings on your tines (for several reasons you’ll see later in this article), you may be stuck. Even if it seems like the material should come off easily, in practice, after months or years, it often becomes much harder—or even impossible—to fully remove from the metal.
So if that happens, you’ll have to live with the original markings or sand down, or even fully replace, your tines. That’s why we recommend using stickers only.
Where can you find stickers for a thumb piano?
Below, you’ll find all the options available for getting these must-have adhesives for your kalimba.
1 – At music stores
The simplest solution is to visit stores specializing in musical instruments. While brick-and-mortar shops offer immediate convenience, they tend to charge more and may not carry adhesive labels since the kalimba is still considered an exotic instrument. As a result, we recommend turning to online stores. At the Instruments du Monde store, you can find all the stickers you need for your kalimba.
2 – Offered as a gift with the Mbira
Sometimes adhesive strips are included as a free gift with your instrument. Most of the time, they’re minimalist and understated. That’s not ideal for customizing your kalimba, but the upside is that you can start using the stickers as soon as your instrument arrives.
3 – DIY PDFs or personalized stickers
Several websites offer free or paid PDF files that you can print out and then place and stick on your instrument. However, you will need a printer and good quality paper to achieve a good end result. You can visit this forum to download a free PDF of stickers. Of course, you can also skip PDFs entirely and make custom vinyl stickers, limited only by your imagination!
Will the stickers fit my kalimba?
If you have an instrument tuned to C major, there’s a good chance they will. Otherwise, you’ll need to find out how your kalimba is tuned to see if the numbers and letters on the stickers will match. If you’re unsure how your kalimba is tuned, use an electronic tuner to identify each tine’s note, then follow this guide that covers everything you need to know about tuning thumb pianos. Once you’ve done that, you’ll know exactly which key your instrument is in.
I have several types of stickers. What should I do with them?
After this section, you’ll know how to tell the different sticker types apart—and what each one is for!
Colored stickers used as markers
Some stickers are solid colors, sometimes fluorescent, often red or green, and these serve as visual markers to help you find your way across the tines. They can be placed on the tines, on a short or longer section, depending on what you prefer. In theory, you could put them anywhere you like, based on what feels most effective for you. However, I recommend two specific layouts that appear in almost all tablature, and I also need to warn you about a common pitfall.
The Hugh Tracey layout
Ethnomusicologist Hugh Tracey, an expert on African instruments, popularized the kalimba in the mid-20th century, giving it the familiar look we know today. To make learning easier, he suggested placing a sticker on the middle tine (the longest one), then leaving two tines blank and placing another sticker on the third—continuing that pattern on both the left and right sides. For a 17-tine kalimba, you’ll use 5 stickers. You’ll find the diagram right below.
The modern layout
More recently, some players have developed a more modern layout with 6 stickers. Three are placed on the left side, while the other three are placed on the opposite side, as shown in the diagram below:
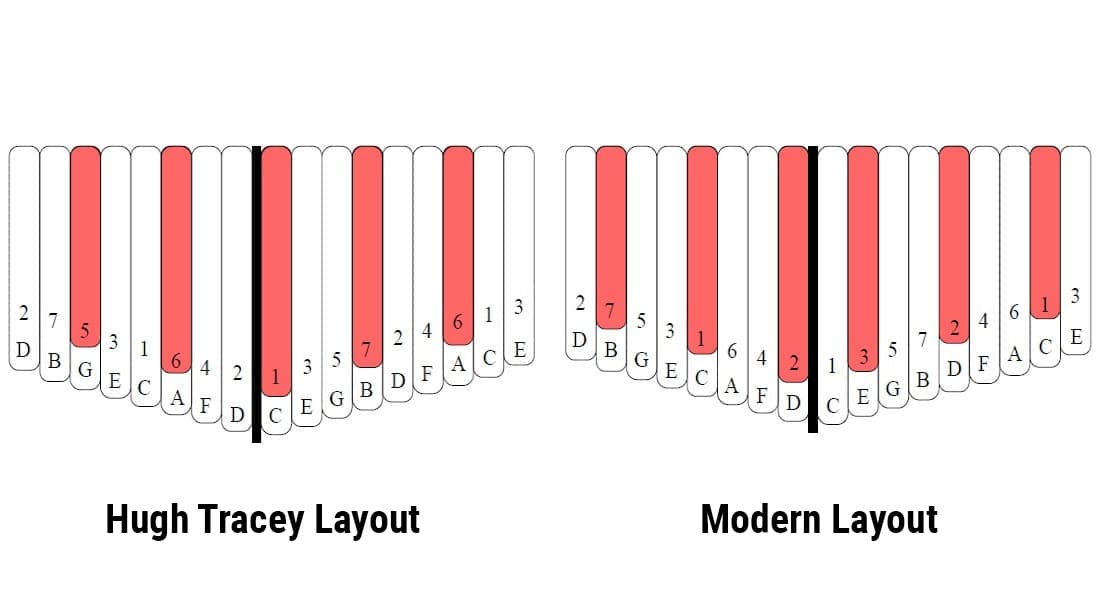
This layout is not random. When Hugh Tracey proposed his sticker placement, he did so with a 15-note kalimba tuned to G major, and this layout was very well suited to that tuning. However, since most kalimbas today are tuned to C major, the notes on the tines are no longer in the same positions as on an instrument tuned like Hugh Tracey’s. As a result, some musicians feel the modern layout is better optimized for learning.
In practice, most tablature you’ll find online still follows Hugh Tracey’s layout, so if you want to play well-known melodies from sheet music, it’s best to stick with that option.
Placing stickers on a 21-key kalimba
If you have a 21-key instrument, the stickers will not be placed in the same way as on 17-key kalimbas. This is because the musical notes are not in the same places, as the four additional keys are always inserted in the middle, shifting the others. We therefore recommend that you follow the model below:

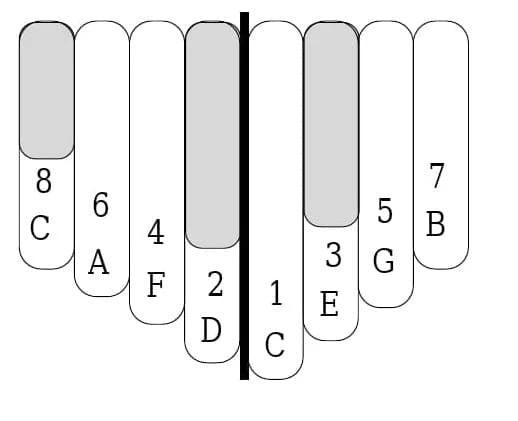
The layout of the vinyl stickers on an 8-key thumb piano
Again, there is a different pattern for small 8-tine thumb pianos:
The pitfall to avoid
You might be tempted to add extra stickers in different colors to “improve” how easily you find the tines. I don’t recommend it, because it often does the opposite. If every tine on your kalimba has a marker sticker, you’ll inevitably get lost. Keep it simple!
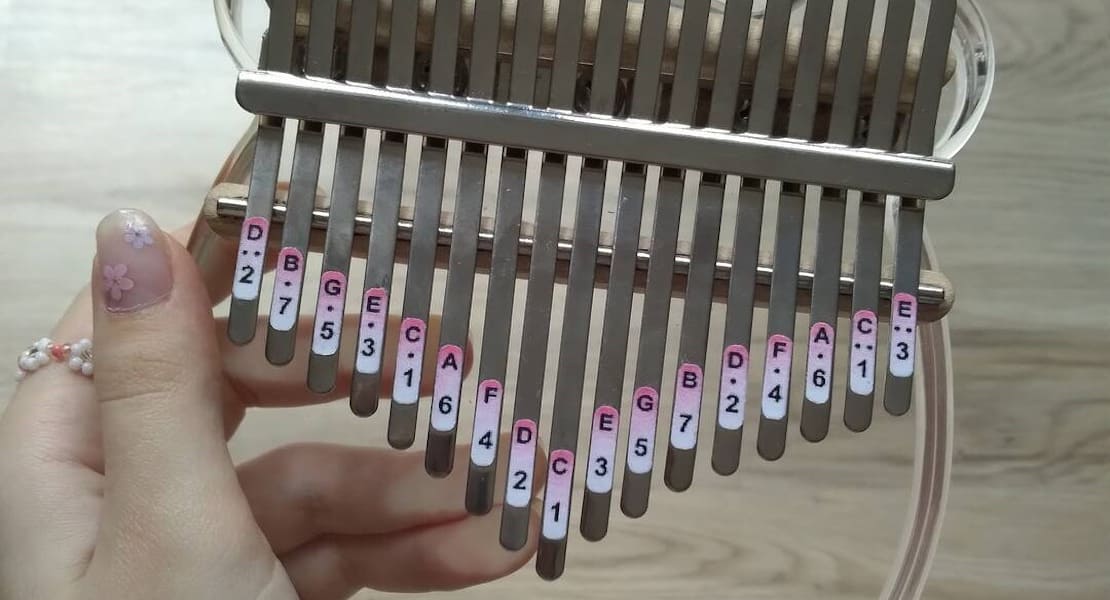
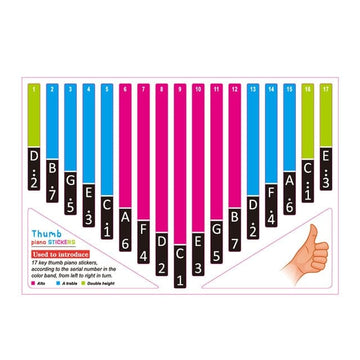
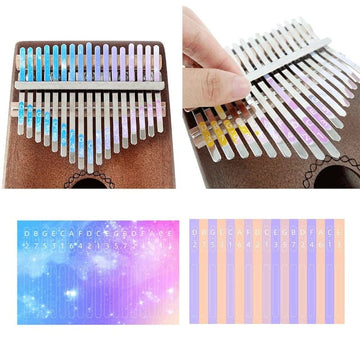
Stickers with letters and numbers for musical notes
These letter and number stickers label notes using either letter names (A to G) or numbered notation (1 to 7). Here’s how they match up:
| solfège | do | ré | mi | fa | sol | la | si |
| letter names | C | D | E | F | G | A | B |
| numbered notation | 1 | 2 | 3 | 4 | 5 | 6 | 7 |
You may see dots above or below the number; this indicates that the note is one octave higher or lower than the same note without a dot.
These stickers must be placed on the correct tine that corresponds to the note in question. Unlike the plain-colored stickers we discussed earlier, you cannot place them wherever you want. These stickers can be placed in the middle of the tine or above the pressure bar that holds all the tines in place. If the sticker is transparent, it can even be placed over a marking sticker.
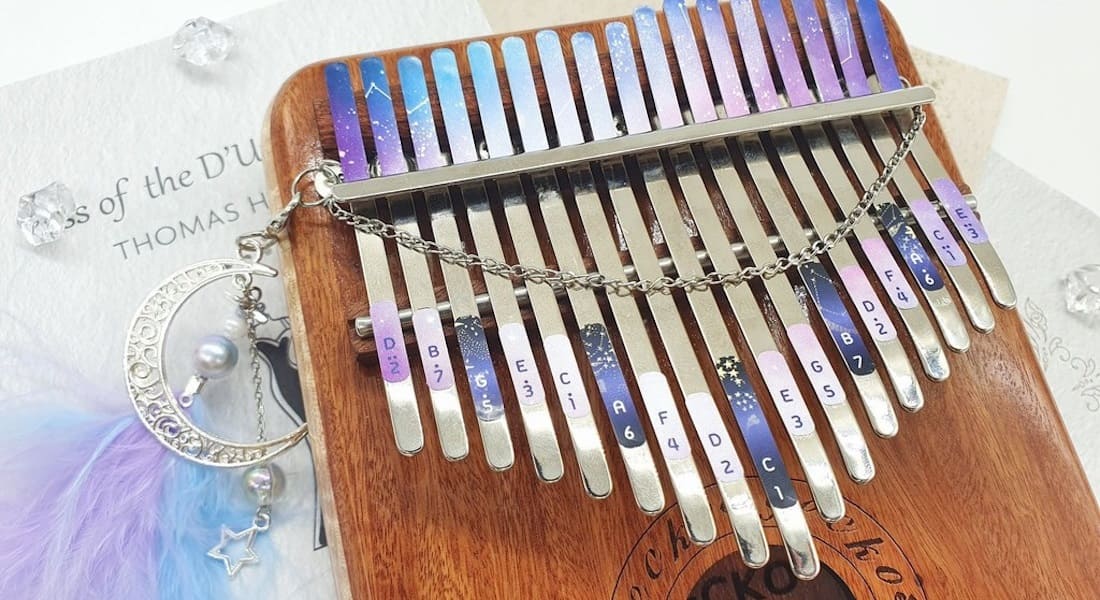
Decorative stickers for customizing your instrument’s look
There are no specific rules for these! Place them wherever you like, even on the body of the instrument, to create a kalimba that is unique to you. Let your inspiration guide you and enjoy a magical moment between you and your instrument as you play a melody.
How to apply stickers to the kalimba
We recommend following the method below to ensure your stickers are applied effectively and optimally.
Clean your instrument
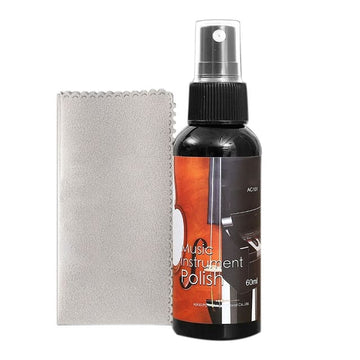
To ensure that your adhesive labels stay in place for a long time, it is important to clean the area where you are going to apply them thoroughly to remove any dust. To do this, we recommend using a soft cloth with a specialized product such as kalimba maintenance oil.
Apply the stickers to your kalimba
Just like regular stickers, this is very simple. Peel the sticker off the sheet and apply it precisely to the desired location. You can, of course, cut the adhesive to fit the length of the tine. Finally, press down firmly for a few seconds, taking care not to damage the tine. However, be sure to follow one rule: never place stickers on the curved ends of the tines intended for the thumbs. Repeated use of the keys will cause friction that will gradually destroy your adhesive, which would be a shame!
For printed stickers, we recommend using school glue, which is easier to remove later.
Why and how can I remove the stickers without damaging my kalimba?
You may need or want to remove the stickers from your instrument, either to change the style or to match a tablature that uses the modern layout while your stickers follow Hugh Tracey’s method, for example.
To do this, first remove as much of the sticker as possible with your fingers, then use a plastic card (such as a credit card) to gently scrape off any residue. Finally, use a specialized maintenance oil to clean the instrument thoroughly and apply new stickers.

Find kalimba stickers that suit your style!
As you’ve just realized, placing your kalimba stickers correctly is an important step for all beginner and experienced musicians who want to progress quickly and effectively in playing this instrument. It’s also essential to adapt the sticker placement to the kalimba you own to get the best results. Now that you know what you’re doing, you’ll be able to apply or remove stickers on your kalimba like a true pro.
Unfortunately, the stickers often supplied with the kalimba can look dull and generic, even though this instrument is easy to personalize. That’s why, at Instruments du Monde, we created a collection of much more colorful stickers that will undoubtedly better suit your personality and tastes. With these, a relaxing sound session is guaranteed!
Discover them by clicking on the image below:
Now that you know where to place your stickers, did you know that the wood used to make your kalimba has an influence on the sounds it produces? Discover all these subtleties by reading our article dedicated to choosing wood for your kalimba. You’ll then know the difference between mahogany, acacia, and walnut for your musical instrument. Otherwise, check out our complete guide to the kalimba.


