



Written by Ambre Montespan on Mar 14, 2023 · Updated on Oct 15, 2026

Table of contents:
Have you recently discovered the tongue drum, a highly melodic percussion instrument? Would you like to try your hand at making one? Are you wondering what the key steps are and what materials you will need?
Having crafted several completely handmade tongue drums myself using reclaimed materials, I can clearly explain how you can build this musical instrument too.
A tongue drum is made from a used gas cylinder that’s cut following a precise pattern so it produces accurate musical notes. To do this, you’ll need a variety of tools.
After reading this tutorial, you will know:
- The steps for building a steel tongue drum
- How to make a wooden tongue drum
- Whether there are kits available to help you make this musical instrument
You’ll then be able to craft your own fully handmade steel tongue drum and tune it however you like to get the sound you’re after.
Let's get started by exploring how to make a tongue drum.
How do you build a steel tongue drum?
In order to create a tank drum, you’ll first want to make sure you have the right tools, then choose the cut plan you’re going to use, and finally build the instrument itself.
What materials do you need to make a tank drum?
Here is a list of the materials you will need to build your tongue drum:
- An empty used gas cylinder (a small one with a 12 in (30 cm) diameter will do just fine)
- A bench vise, straps, or any other way to keep the gas cylinder from moving
- A large pair of groove-joint pliers
- An angle grinder, cut-off tool, jigsaw, or any other tool for cutting the surface of the gas cylinder
- A drill with a set of metal drill bits
- Any tool for sanding metal
- A hacksaw
- A marker
- A tuner
- Paint (optional)
Where can you find a diagram or plan for designing a steel tongue drum?
Before you start making your tongue drum, you need to find a plan for the cuts you will make on the upper shell. Choosing the right diagram is an important step, as it will determine how your instrument is tuned and therefore the sounds it will produce. You will also need to choose a diagram that matches the diameter of the gas cylinder you have. For example, you might choose a tongue drum plan in the Akebono scale or the Pygmy scale. If you're not sure which tuning to choose, read this article to help you choose the key of your tongue drum. Things will then become much clearer.
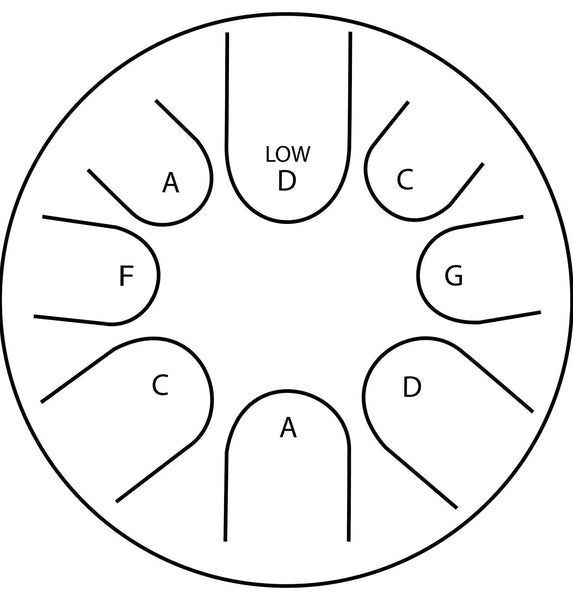
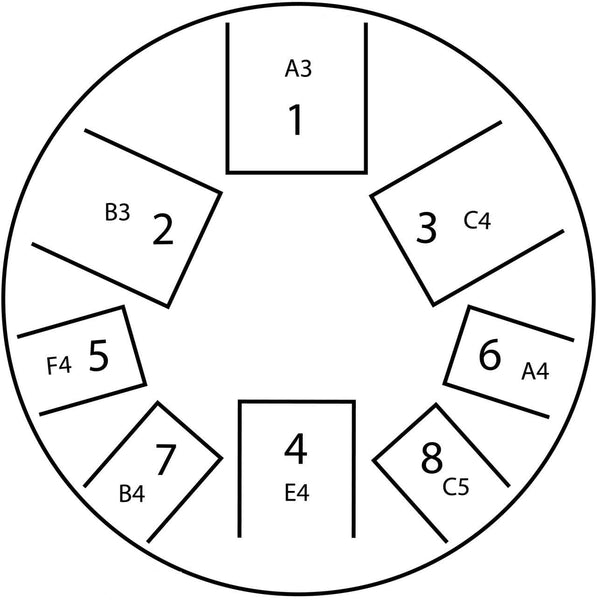
Below are a few diagrams to help you make your tongue drum; the first was created by Dennis Havlena, the inventor of the tongue drum in 2007. These diagrams are designed for gas cylinders with a 12 in (30 cm) diameter.
D minor pentatonic scale:
A minor pentatonic scale:
If you’re looking for even more options, there’s no single database that collects every tongue drum plan, so you’ll want to browse blogs by passionate musicians who love sharing their diagrams.
How do you make a DIY tongue drum?
First, it’s important to note that building a tongue drum inevitably involves handling tools and materials that can cause injury, so they must be used with caution. Also, working with a gas cylinder can be dangerous if it hasn’t been fully emptied before any cutting or drilling. You have been warned, and I cannot be held responsible for any accidents that may occur.
Step 1: Empty the gas cylinder
The first step is to empty the gas cylinder to ensure that there is only air inside. This is an essential step, as you cannot drill or grind the gas cylinder while it still contains butane or propane. These tools will inevitably create sparks that could ignite the gas and cause an explosion.
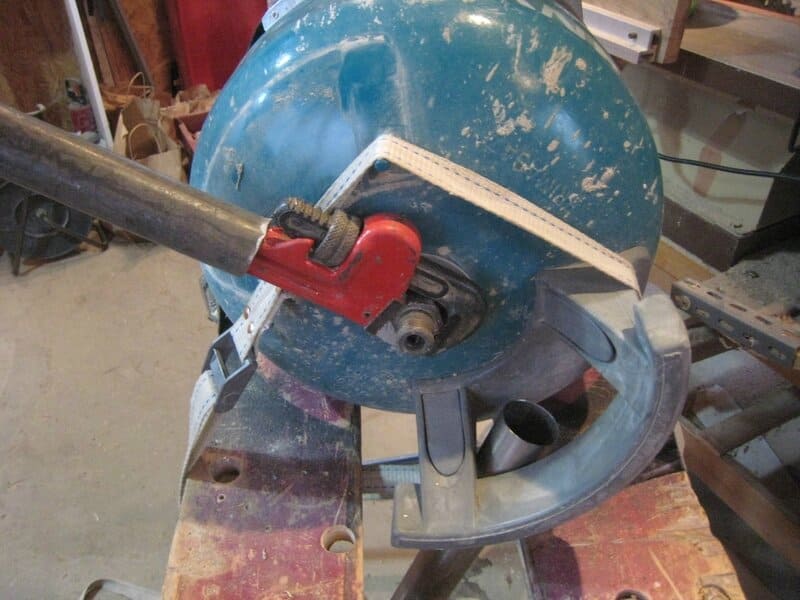
To ensure the cylinder is empty, you must first unscrew the valve. To do this, use a vise or any other means such as straps or clamps to prevent the gas cylinder from rotating. Then use a long wrench to unscrew the valve. You’ll need a lot of leverage, as the valve is screwed on extremely tight. You can use the photograph below as a guide:
Once the valve has been removed, fill the entire gas cylinder with water until it overflows. This will allow the water to flush out any gas residue that may be inside. Then empty it and repeat the operation a second time to be absolutely sure that there is no gas left in the cylinder.
Step 2: Remove the supports from the gas cylinder
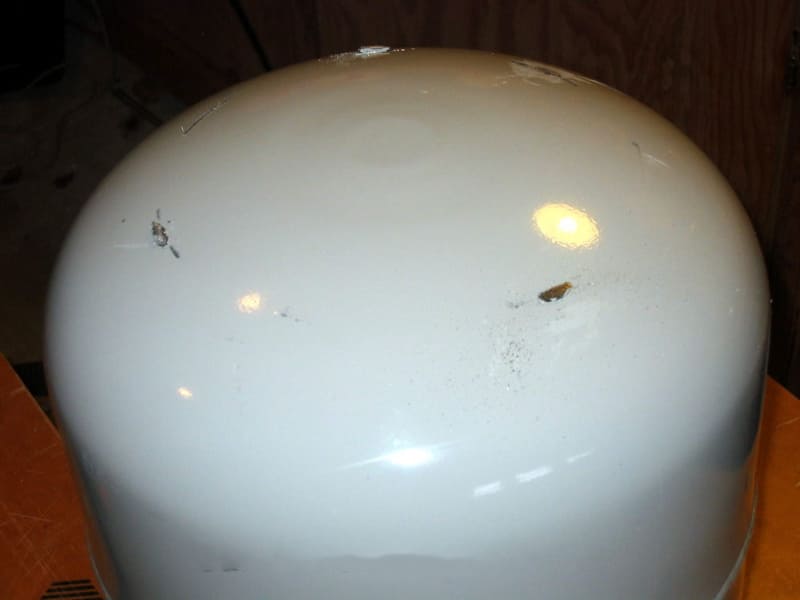
You now have a completely empty gas cylinder. However, most cylinders have supports welded to their upper and lower parts to keep the cylinder upright when placed on the ground. You will remove these supports using a grinder. Then sand the surface until it’s smooth. This not only improves the look but also helps prevent injuries when playing your future tongue drum. You should end up with a result similar to the photo below:
Step 3: Mark the cuts on the surface of the gas cylinder
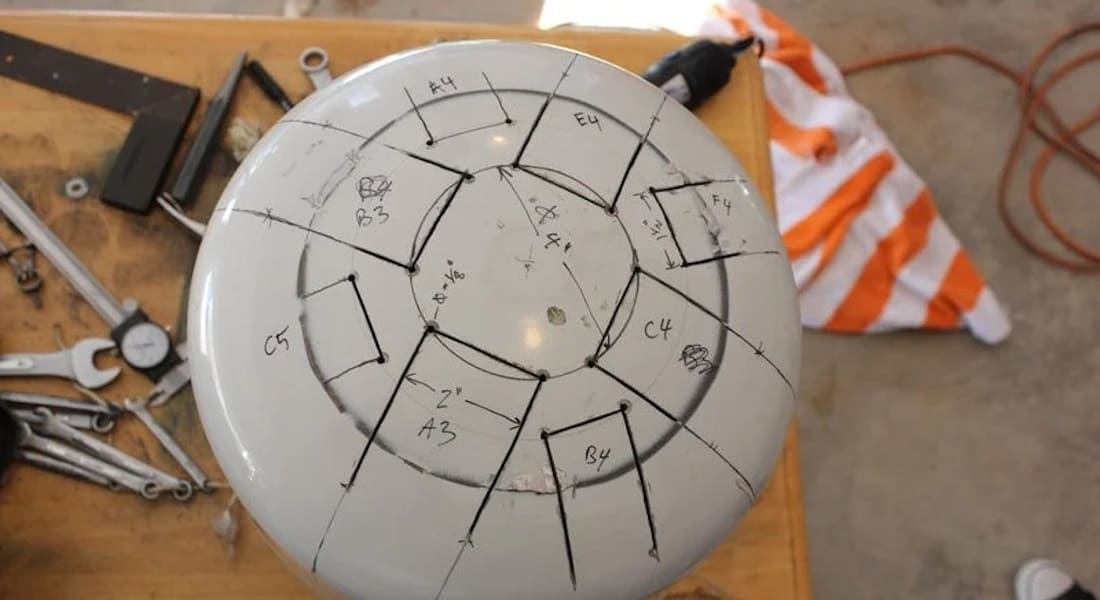
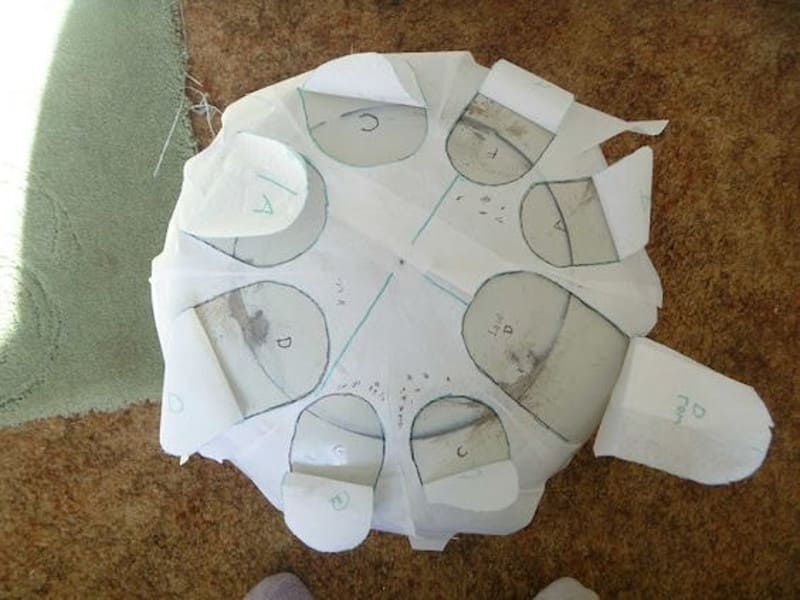
Next, print out the diagram or plan of the cutouts that you obtained earlier. You may need an 11.7 × 16.5 in (A3) printer, or even larger, depending on the diameter of your gas cylinder. This diagram will serve as a template, just like in sewing. Place it on the side of the cylinder where there is no valve hole, then trace the shapes of the future cutouts onto the metal with the marker.
Be very precise, as the dimensions of these cutouts will determine the future musical notes. You can also cut out your template to make the task easier, as in the example below:
Step 4: Cut out the surface of the future tongue drum
Now carefully cut out the metal surface of the gas cylinder along the lines you drew with the felt-tip pen. You can use just the grinder or drill pilot holes and then finish with a jigsaw. Take your time and work as precisely as possible—this is the most important step.
Step 5: Tuning the musical instrument
At this point, your steel tongue drum is almost finished. You can even tap on the cutouts to start playing notes. However, it is very likely that these notes will not be entirely accurate, so you’ll need to use a tuner to check. Turn on your tuner and test a note to see if it is accurate. If it isn’t, you’ll need to slightly adjust the orientation or surface area of the cutout to change the pitch. You can either gently bend the tongue with a screwdriver or hammer, or lengthen the cutout with a hacksaw for greater precision. Once all your tongues are properly tuned, your percussion instrument is almost complete.
Step 6: Finishing touches
This step is optional, but it’s much more enjoyable to play melodies on a beautiful, presentable hank drum. If there are any rough edges, sand them down, then let your creativity shine by painting the gas cylinder any way you like.
Your tongue drum is now complete. All that’s left is to learn how to play it, which you can do right away by reading this other article.

Is it possible to make a tongue drum out of wood?
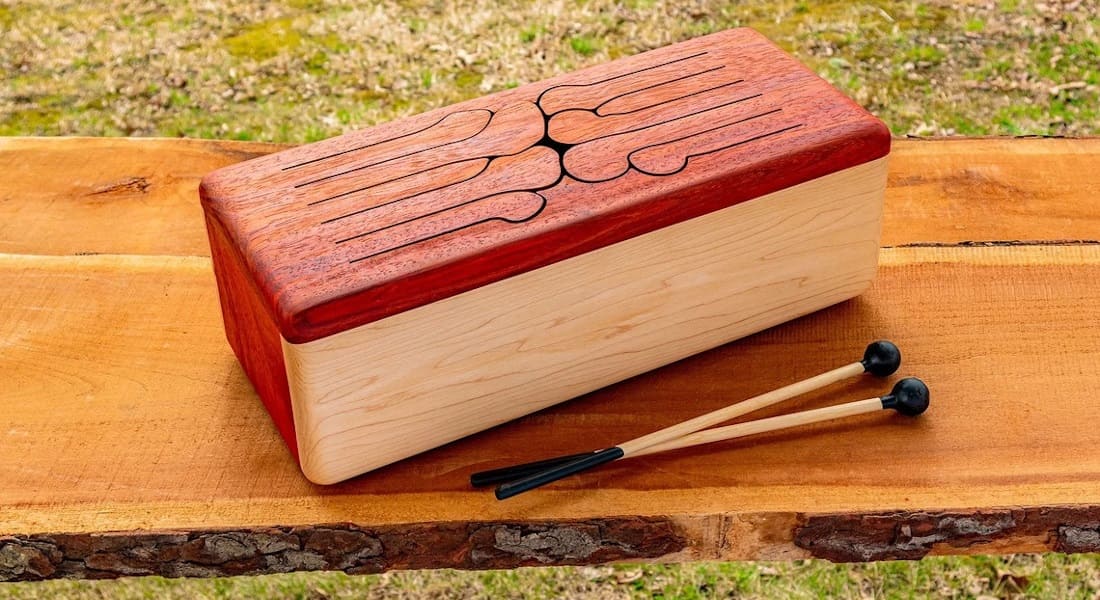
Sometimes called wood drum or log drum, there is a version of the tongue drum made entirely of wood. To make one yourself, you first need to build a box without a lid, measuring approximately 24 × 8 × 7 in (60 × 20 × 18 cm). You can use any type of wood you like, which will influence the sound and appearance of the instrument. You can also use plywood which will be less expensive.
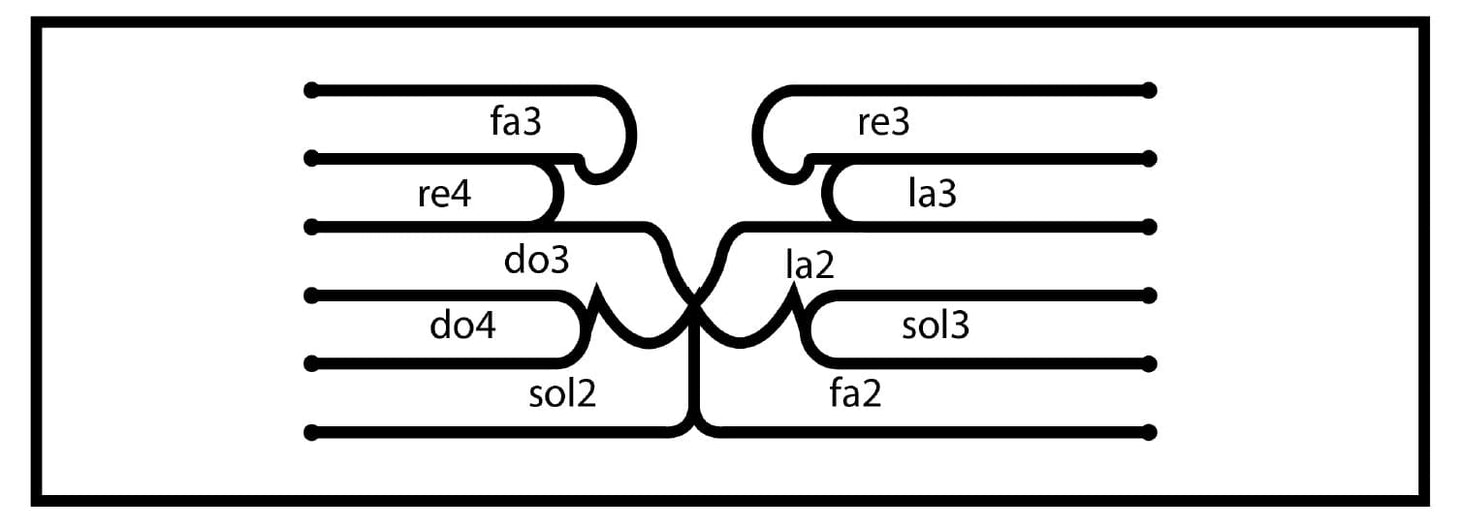
Next, focus on the top board that will act as the “lid” for your box. As with the metal tongue drum, start by locating a suitable diagram, then cut the board to match. If you’ve followed the recommended dimensions above, you can use this one:
Next, cut the board with a drill and jigsaw, then sand it smooth and apply a light coat of oil to bring out the wood’s natural luster. To add visual flair, some musicians skilled in marquetry create beautiful engravings or veneers that transform the instrument into a true work of art. All of this is optional, of course. Once you have made the cuts, you will need to tune the instrument as explained above for the metal version. Then you can enjoy playing it!
Are there any tongue drum kits available?
At the time of writing, unfortunately not. The tongue drum is still a relatively unknown musical instrument, and manufacturers have not yet found it profitable enough to offer ready-made kits for making tongue drums. You’ll have to source reclaimed materials or visit a hardware store to find what you need.
Take it to the next level and treat yourself to a professional tongue drum
The tongue drum was originally invented by an amateur musician using an old propane tank, and it’s no surprise that others have been inspired to craft their own instruments based on this model. Now you have all the steps you need to make your own 100% handmade tongue drum and complete this interesting project.
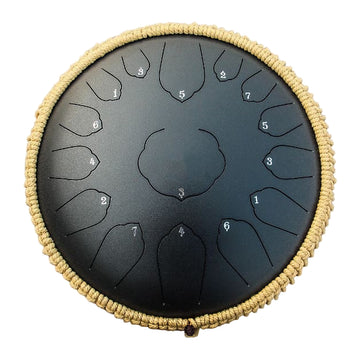
However, making a tongue drum is not for everyone. It requires a lot of tools and a fairly high level of DIY skills. What’s more, there is a risk of injury. As a result, the Instruments du Monde store offers more than 50 different tongue drum models to satisfy all those who don’t have the tools, time, or workspace to build their own. Like this magnificent 15-note Butadrum, which will take you on an exceptional musical journey.
Buy this percussion instrument now by clicking on the image below:
Have you finally given up on your desire to build your own musical instrument? In that case, check out our guide to the best tongue drums currently available on the market. You'll then be able to make the best possible choice. Alternatively, learn everything there is to know about tongue drums by reading this other article, which covers the subject from top to bottom.


